I made a new costume! Netrunner Lucy Kushinada from the anime Cyberpunk Edgerunners!

This 10-episode series is a Netflix Exclusive made by Studio Trigger based in the world of CD Project Red's Cyberpunk 2077 video game! And it is spectacular. I hotly anticipated Edgerunners since it's announcement and the anime did not disappoint my high expectations!!


(Credit: Netflix)
Once I realized I had everything in the house to make Lucy’s costume, it was on!
This blog documents the process of this costume and I hope it helps/inspires other cosplayers!

Project Lucy timestamp: 90 hours
At first glance, Lucy’s design looks fairly simple, but I ended up spending over a week making her, mostly because I made full use of my Cosplay Fabrics collection.
There are 8 different fabrics in this costume, puzzled together for visual interest and double layered in certain spots for durability.


The Cosplay by Yaya Han collection has released so many “futuristic” fabrics that I was actually drowning in options, as you can see! In the end, I decided to go with geometric hex fabrics with accents in holographic mirror foil, reliable ultrapreme and 4-way stretch pleather.
Besides using only fabrics from my branded collection, all the sewing patterns I used were ones I designed for McCall patterns! It makes me very proud to have created so many useful materials for cosplayers, enough for me to make an entire costume!
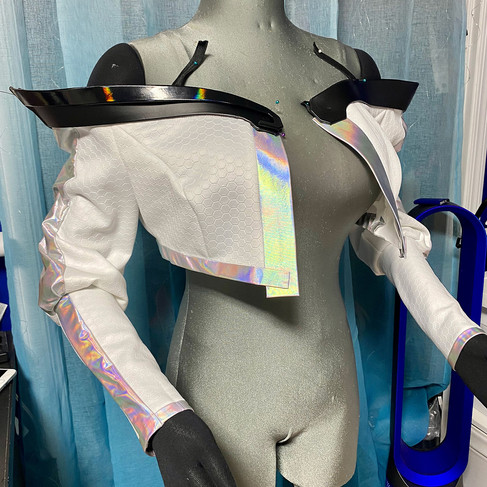
The first part I worked on was Lucy's floating jacket. It is off the shoulders, cropped and kind of floats around her. I used my McCall's M7733 cropped jacket pattern to draft a mock up of Lucy's jacket, marking and cutting where needed.
I made the actual jacket out of scuba hex, which is weightier than your average spandex, The EVA foam trim helps the jacket stand up a bit more and I covered it in pleather then sewed it onto the top hem.
I decided to use holo mirror foil for a pop of shine on parts of the jacket and really like the effect it added.
While fitting the jacket, I just pinned elastic straps to it so I could "float" it on my dress form. These are temporary.


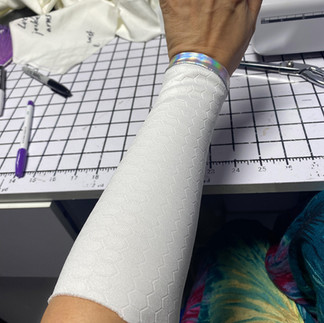


I often let one part of a costume marinate while I work on others so I switched gears to make Lucy's bodysuit using my trusty McCall's bodysuit pattern. The geometric honeycomb fabric is a bit thin on its own so I went through the trouble of cutting and basting a layer of pleather under each piece.
I also used scuba hex for the center back pieces because it is a more durable and breathable material and I could put more strain on it with the zipper.
You don't have to make a bodysuit out of one single fabric. Feel free to match different ones and choose something strong and breathable for the back!


I love binding edges on bodysuits with a contrasting edge so I used my black mirror foil for a pop of shine. You can see in the try-on photo what the bodysuit looked like without the binding and it is clearly not as clean and finished looking.
That mirror selfie was taken after 2 evenings of sewing, during which I also made the white scuba hex shorts and a pair of leggings in Ultrapreme that I will cut up for Lucy's chaps. I don't know why I gave myself more work by adding a raised piping down the center of the legs lol


At this point I thought "Alright, let's finish the jacket so I have at least one completed garment for this cosplay!"


I really love the cut of the jacket and the holo mirror foil at the edges and sleeves!
Eventually, the jacket snaps onto the front of the bodysuit and there are two loops sewn in the back that hook around small black buttons on the bodysuit.
Motivated by the finished jacket, I worked on Lucy's panties/chaps. I basically tried the pieces on a bunch of times to pin or mark various areas that had to be cut out, puzzled together and finished. Because I chose to use a variety of materials and to bind every visible edge, it took a whole fussy day without much progress documentation.


I ended up with one of the weirded garments I have ever made lol
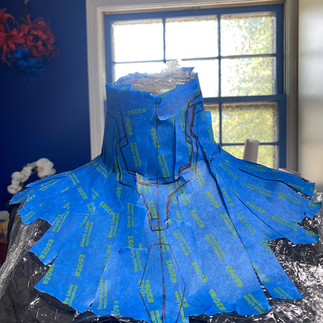
But wait, there was more work left! Lucy has a very plugsuit-esque collar that I could have simplified, but I thought it was a central enough piece to give it special attention.
I pattered a two-tier collar with masking tape and transferred the tiny pieces onto 2mm EVA foam. The under-layer was covered in red pleather, and the over-layer was carefully installed into the bodysuit while I was wearing it. Yes I pricked myself a few times lol. I glued the bodysuit fabric around the shape of the collar, then blind stitched it for reinforcement.
Lastly, the red under layer was carefully pinned to the collar and glued/hand-sewed in as well.
The whole process took a good 5 - 6 hours but I am really pleased with the formed collar look!


Another project I tackled were Lucy's boots, for which I made leg warmers out of soft foamies covered with black mirror foil. Again, masking tape pattern, cut, cover, assemble.


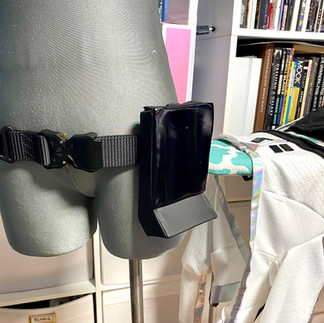
The last piece on the costume was the pouch/communicator thing on her belt. I bought a tech-looking belt but made the pouch from scratch, and I actually sized it a tad bigger to be able to fit my phone haha.
This was just a lot of math and shapes, cut out of 5mm EVA foam and glued together. I decided to make a fabric cover for the pouch out of Ultrapreme because it is a near indestructible material. That added a couple more hours to my work load but the end result looks nice and will be functionally durable!


With the pouch done, I had a completed costume! Hurray!
But wait, I still had to make Lucy's pastel rainbow asymmetrical bob wig! And OMG wigs are my number 1 weakness, I kinda hate cutting/styling/coloring them lol!
This next part was definitely the most challenging aspect of this costume.
Okay so I worked on the wig alongside of the costume, psyching myself up for some progress and then retreating into the familiar territory of sewing.
I started out with two wigs, a mid length lace front and my very old Christie wig from 2008. I was never going to wear it as is again (fibers are too ratchet), but it made for a perfect base to cut up the lace front and sew to.


This method gave me volume!
Then came a few hours of careful cutting. I get super anxious cutting wigs so I sectioned off the parts and went slowly, layer by layer. Eventually I ended up with an approximate Lucy wig, erring on the side of too long than too short.


Next came the arduous task of coloring the wig! I decided to go for gradient colors rather than anime Lucy's color blocked hair with hard lines. After considering various methods, I went with airbrushing because I thought it would give me more control over the mixing of colors. I did multiple tests on hair wefts and mixed up the blue color first. Starting from the bottom bow, I slowly airbrushed the wig 2 - 3 weft rows at a time, going from a sky blue color to pale ice blue at the outer layers.
Then I mixed up the pink and carefully airbrushed the top of the wig.
If I were to do this wig again, I would have started with the pink first.


As for what I mixed into the airbrush... well, it started with FW ink diluted in 70% rubbing alcohol, but I had to mix in acrylic airbrush colors as well to get the right shades. The wig took it alright.
As for the mix ratio, you really have to test it a lot because the colors are so pale, but I would say 80% of my mixture was alcohol and only 20% was color.
It took a long time BUT I had amazing control over the color and I kept a wet shop towel nearby so anytime a section was too vibrant, I could wipe off the color until it became pastel! I will definitely use this method on future lighter wigs again!
Another step I took after the first airbrushing session was to set the color with a hand steamer. I simply steamed the wig section by section and left it overnight to dry. The steam really helps seal the colors and I haven't had any color transfer!

For the second coloring session, I wanted to tackle Lucy's rainbow hair strands. Last minute, I decided to try hair chalk, which I had on hand, and.... it worked!
Per the instructions, I lightly wet a section of hair, then painted the hair chalk on (while wearing gloves!). The colors were more intense, but I wiped off the excess with a shop towel dipped in rubbing alcohol and eventually got the pastel I wanted!
I think airbrushing would have worked just as well, I was just compelled to try another method and now I have even more options when it comes to coloring wigs! Seriously, learned so much.
After setting the color again with steam and waiting for the wig to dry, it was finally time to style it. I went for a voluminous bob that turned in at the ends because it harkens back to another beloved Trigger character I've cosplayed - Lio Fotia! Maybe for another wear, I'll straighten the ends and see what that looks like on me....


And with that, Lucy is ready for Night City!!
Last night I did some test shots in my warehouse using a funky backdrop I had (intended for Lio actually lol!) and some RBG lights.


I also had a Japanese street backdrop on hand so Brian helped me snap a few shots in front of it as well!


It’s always a bit magical to put on a new cosplay for the first time and see all the hours of work come together! I had fun with the makeup as well, although I will definitely darken the eyebrows a bit next time because white eyebrows looks weird on me! Shout-out to Surreal Makeup for their shimmery holo eyeshadows that were simply made for the Cyberpunk aesthetic!
For these photos, I mostly fussed over how the costume read on camera so no cool poses or setups, but I’m actively looking for photo opportunities for a Cyberpunk shoot in Atlanta or elsewhere.
My upcoming travels include San Diego, London, Tokyo and Osaka so if you have a lead on where I could do a Lucy shoot either on location or in a studio, please let me know!

By deciding to mix several fabrics for this cosplay, I probably doubled my work time, but the end result is satisfyingly high-tech looking and I’m confident this costume will stand up to wear-and-tear 👍. It has been so fun to mix and match textures!
I started the year with Belle, made in a mad dash week after watching the movie. It seems Cyberpunk Edgerunners compelled me to do it again with Lucy! What can I say, @trigger_inc makes incredible anime and Edgerunners is their newest masterpiece. Don't sleep on it!


